
How To Fix SSL Errors – 10 Things To Do After Installing SSL
This is an extended post from "The Beginner's Complete Guide to SSL Certificate", to help you fix the potential errors you may be facing after installing SSL certificate on your website.
Installing SSL can be a very troublesome process if you don't have the right means and support because SSL certificate itself is a really complicated thing to handle. The worst thing to happen is that it may even break your site if something goes wrong.
But, don't worry! If you've read my Beginner's Guide to SSL, you will have a clear understanding of what it is and how it works. If you've followed the steps in the guide, that's even greater, you will surely have one set up in place right now.
However, installing SSL is not the end, this post will guide you on what to do afterwards. There are 10 Steps to take and I'll explain that later on. At the same time, if you encounter any problems, this post can help you sort it out.
More...
STEP 1: Check All the Pages on Your Site Manually
After installing SSL, the first thing to do is to go to your website and check whether you have a green address/URL bar with a padlock icon on ALL your pages. I repeat, ALL YOUR PAGES, not just your homepage.

How a secured website with SSL looks like in different browsers. (Click image to enlarge)
The image above shows the thing you should look out for in different browsers. There are 3 scenarios that you will encounter...
Scenario 1: All Set
All the pages on your website have the icon required.
This is the best outcome because that means your SSL is installed successfully without encountering any errors.
If that's the case, you can jump to STEP 6 straight.
Scenario 2: Mixed Content Error
In this scenario, you will probably see an information icon like this on some or all of your pages:


This means that there are some files, images, plugins, etc in your website that are not secured. Due to their presence, your browser is alerting you that there are insecure elements on your website. Nevertheless, your website can still show up in this scenario so many people are unaware or tend to ignore the icon. They thought their websites are secured.
If you are having this problem, proceed on to the next step.
Scenario 3: SSL Certificate Not Trusted
This is the worst case scenario you would want to encounter.

Click image to enlarge
You may see things similar to the image above and in most cases, people can't access your website.
This happens because the certificate you are using is either faulty or not certified by Certificate Authority. Or there are some verification errors in it. Either way, it's the technical error which is out of your control.
The only thing you can do here is to contact the company you purchased the certificate from or your hosting server if they offer your SSL.
This leads me back to the point where I need to emphasize on the quality of certificate and hosting server you choose. If you choose a lousy one because you want to save money, then you have no one but yourself to blame.
If so unfortunate that this happens to you, I'm sorry this post can't help you.
If you listen to my advice, my recommended hosting company is Wealthy Affiliate.
You can have access to their state-of-the-art hosting, support and FREE SSL (for Premium Members) at a very reasonable price. And you won't encounter the third scenario here! (which is completely possible if you choose a low quality certificate or even worse, a scam)
Go to my Beginner's Guide to SSL page to find out more.
STEP 2: Clear Cache & Check Again
For scenario 2 and 3, what you can try is to clear the cache of your browser and try it again. The chance of fixing is very low but you should still try it.
STEP 3: Find Out What's the Error
Now, this is only for scenario 2, it's time for you to figure out what exactly are the things that cause mixed content error.
For this step I use the website: https://www.whynopadlock.com/
Simply enter your domain name and within 60 seconds, it will tell you what are the things that are not secured.
Here's a list of the most common errors:
- Your logo image
- Favicon
- Header image
- Sidebar image
- Banners
Very often, the file URLs of these are not updated to "https".
Another way to find out the errors is by (for chrome only):
1. Right click on your mouse & click "inspect" OR just press "ctrl+shift+I" on the page where there's no padlock.
2. After that, you should see something like this:

Click image to enlarge
3. Click on the "console" tab.
4. Your website errors will be listed in the console tab. (Don't worry, it's in simple English, not the code.)
STEP 4: Do the Necessary Changes
After analyzing the problem, now let's fix them. There are two methods.
Method 1: Use Plugin
There's a plugin called "SSL Insecure Content Fixer". You can download it and let the plugin do the job for you.
Here's a tutorial on this plugin:
WATCH VIDEO: SSL Insecure Content Fixer Tutorial
Method 2: Do It Manually
For mixed content errors, they are usually easy to fix. So I would recommend you to fix them manually instead of using the plugin because it's much safer. You'll never know whether the plugin will cause any other errors on your site or even break your site. Also, it's one more plugin on your site which can slow down your site.
For the common errors I listed above, you can't fix them simply by adding a "s" to http for the file URL to make it https.
For errors in the widget area, you go to your dashboard -> widget -> find the particular widget which is causing the problem -> look for any URLs begin with http -> add a "s" to make it https.
For logo, header, favicon, etc, go to their respective edit page to change the http.
For other errors, as long as they are listed in the console tab, you just follow what it says and go to the source to fix it.
That's it. It's not very difficult even for people who know nothing about coding and programming.
Mixed content errors are the most common ones and they can be fixed by yourself. If you encounter any other errors, go ahead and contact your hosting support or certificate support for help. (Support at Wealthy Affiliate can be easily accessible and they generally respond within minutes.)
STEP 5: Do One More Check
After you've fixed all the errors, it's time to do one more check on all your pages. Check whether the padlock is present on all pages.
If it is, proceed to the next step. If not, go and sort it out before proceeding.
STEP 6: Update Your Google Analytics
By this step, you should have fixed all the SSL errors and gotten padlocks for all of your pages.
This is when you need to update your website information in Google. We start with Analytics.
1. Log in to your Google Analytics.
2. Click Admin -> Select the property (The website you want to edit)

Click image to enlarge
3. Click "Property Settings"
4. In the property settings page, under Default URL, choose "https://" for your URL.
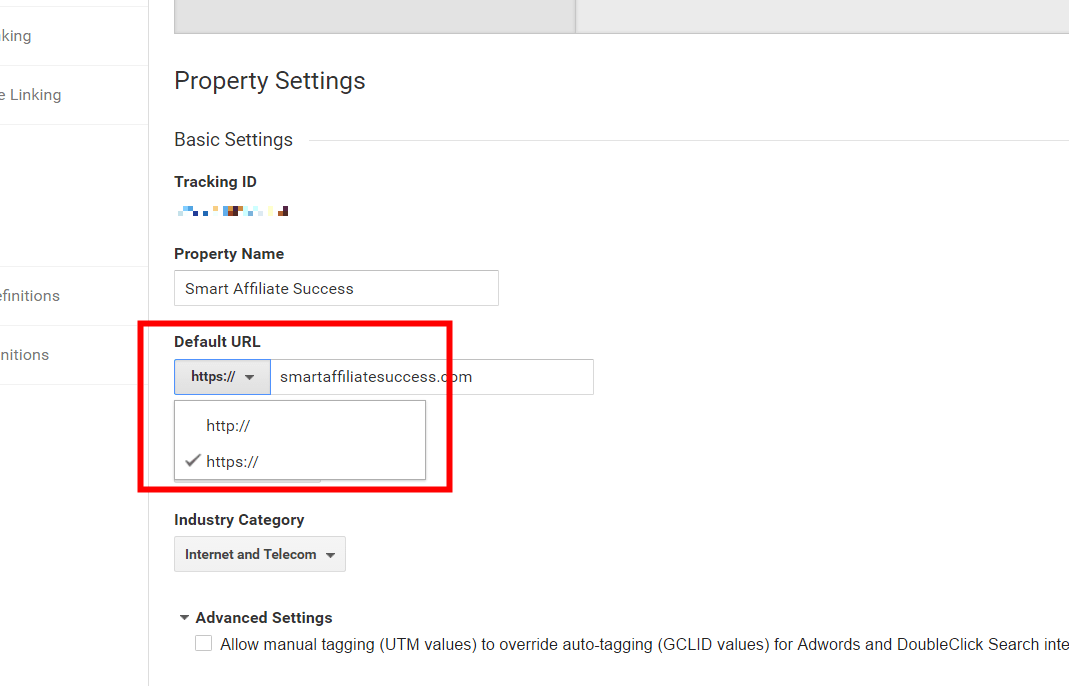
Click image to enlarge
5. Click Save then you are done!
If you haven't had your Analytics setup, you can simply setup one with https.
STEP 7: Update Your Google Search Console
1. Log in to your Search Console (previously known as Google Webmaster)
2. Click "Add a property" at the top right corner. (Yes, you are going to leave your old http property as it is and add a new https property. I'll explain this later.)
3. Enter your URL with the "https://" (Double confirm your URL is correct or you can simply copy and paste from your website)

Click image to enlarge
4. After that it will lead you to a page to verify ownership of this new property. Since we already have our Google Analytics setup. I would recommend verifying using Analytics (although it may not be the recommended one by Google).
5. Select the Analytics option and click verify. Within seconds, your ownership will be verified.
6. Congratulations you are done for this step!
Now, I'll explain why.
When you switch your site from http to https, all the traffic that is going to http will be automatically redirected to https. All these are still YOUR traffic. You wouldn't want Google to "forget" about the traffic that is going to your http URL. That's why you leave your old property there while create a new property.
In the short term, there will still be traffic going to your old URL. But you will slowing see a decline in the old property while an increase of traffic in the new property.
It's fine to leave both property there forever while some people suggest you could delete the old one after six to twelve months. It's up to you.
Again, if you do not have your Search Console already setup, simply add a new property as explained in this step and you are good to go.
STEP 8: Re-submit Sitemaps
After you inform Google that your site is now "https://", you need to re-submit your sitemap to Search Console for better indexing.
1. Still at Search Console. Click on your https property.
2. In the dashboard, click "sitemaps".

Click image to enlarge
3. At the top right corner, click "Add/Test Sitemap".

Click image to enlarge
4. If you are using All-in-One SEO plugin or Yoast SEO plugin, you can access the URL of your sitemap there. If not, you can download a plugin called "Google XML Sitemaps" by Arne Brachhold to generate your sitemap.
5. Enter the URL of your sitemap and click submit.
6. You're done! Just wait for it to be indexed.
STEP 9: Update Bing Webmaster
The next step here is to update your Bing Webmaster Tool. If you haven't setup one yet, it's a good time for you to setup.
For Bing, you do not need to create a new property if you already have one http property. Simply add a new https sitemap to Bing. That's all you need to do.
Definitely, for those of you who haven't setup Bing Webmaster before, simply add a new property with https URL and remember to submit a sitemap as well.
Other than Bing, you can also do the same to other search engines like Yandex.
STEP 10: Final Check!
After all these are done, it's time to do a final check on everything.
This is to check that everything is working fine on your site. For example, your
- Plugins
- PDF downloads
- Email autoresponder (remember to update the links in your Emails sent to your leads)
- Site Email
- Your URLs in all social media and other places
The Switch to SSL Checklist
- Check All Pages on Your Site
- Clear Cache & Check Again
- Use WhyNoPadlock.com to Find out What's the Error
- Make the Necessary Changes
- Do One More Check Before Updating Search Engines
- Update Google Analytics
- Update Google Search Console
- Re-submit Sitemaps
- Update Bing Webmaster
- Final Check!
Conclusion
That's all for today's guide. I've made it very clear and step-by-step so that everyone is able to fix the common errors themselves. But if the problem is more complex and technical, you should contact your support for help. They can help you resolve the problem and ensure that your site is not compromised.
However, the quality of the support teams for different company is not guaranteed (simply because I didn't work with them before). I can only assure you that the support team at Wealthy Affiliate is awesome.
I hope you fixed the issue on yourself and enjoyed my guide.
If you are able to resolve it yourself, let me know in the comments below and share this with others. If not, you can also leave a comment below and I'll try to help.
Take care :)


